Beginner classical guitar lesson 5 : Notes on the D string
All these free beginner classical guitar lessons have the same format. Have a look at how this page is layed out and become familiar with where things are. The heading tells you what the aim of the lesson is and the coloured box contains tips and guidelines. Below the coloured box are your guitar pieces that support the aim of the lesson and supporting resources which include accompaniment in mp3 format and free sheet music in pdf format.These lessons, designed for the beginner classical guitar player, build step by step with each lesson building on the previous lesson in the following ways: (i) knowledge of guitar technique; (ii) familiarity with music reading and (iii) strengthening - and in a safe way - your hands. Try and play through all the exercises provided at the bottom of the page. Remember that the house with the solid foundation is stronger in the long run.
I’m getting a lot of messages from people coming here because they want to learn to play guitar as part of worship. If this is you, you might want to join Aaron Anastasi’s programme. Aaron is a musician and a worship leader. He put together a step by step programme for aspiring Christian musicians. If you're interested, you can use the exercises and advice in learn-classical-guitar-today to develop your finger strength and dexterity and Aaron's lessons to work on strumming and worship music.
CLICK HERE TO LEARN WORSHIP GUITAR !!
Beginner Classical Guitar Lesson 5 - Aims
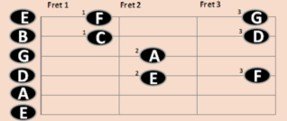
- Become familiar with and practice using the notes located on the D string (4th string).
- Consolidate working with dotted notes
- Become more comfortable with music in two voices (review lesson 4 on this topic).
- Adding the p-i-m and i-m-p combinations of the right hand.
- Your introduction to using the a- finger of the right hand (see Exercise 15).
- Using the eighth note (or quaver).
Exercise 15
Exercise 1 to 14 are included in previous lessons . If you have not already covered these lessons, then I suggest that you do so now as these lessons build incrementally on each other.
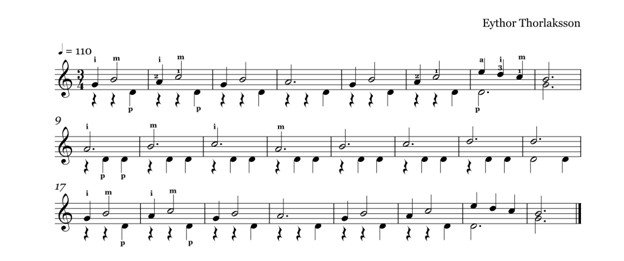
Notes on the study
This piece has two voices. Review Lesson 4 for guidelines on how to approach music written in two voices.
Use the i- finger, m- finger and p- finger as indicated in the score. Notice that the fingering is provided for only the first two bars. The fingering approach provided in these bars are to be used for the rest of the piece of music. See finger names for an overview of the names of the fingers in classical guitar.
Note that the 'a' finger is introduced into your playing in Bar 7 of this piece. This is the first time that you are using this finger and it is bound to feel somewhat uncomfortable, but continue using it and it will soon feel comfortable.
The metronome speed is 110 for this piece. If this piece feels difficult, play through Exercise 16 and Exercise 17 (see below) first as they are slightly easier and will build you up to this piece.
I’m getting a lot of messages from people coming here because they want to learn to play guitar as part of worship. If this is you, you might want to join Aaron Anastasi’s programme. Aaron is a musician and a worship leader and put together a step by step programme for aspiring Christian musicians. If you are interested, you can use the exercises and advice in learn-classical-guitar-today to develop your finger strength and dexterity and Aaron's lessons to work on strumming and worship music. GO HERE TO LEARN WORSHIP GUITAR
Play along accompaniment for beginner classical guitar lesson 5
Two mp3s are provided for this lesson. The one contains both parts of the music and the other contains the accompaniment. Listen to both parts of the music played together so that you can get a feel of the song. Then practice by setting your metronome at a very slow pace. Slowly push up the speed until you can play it confidently at a metronome speed of 100. When you can play it confidently at this speed, you can play along to the accompaniment provided.
|
Listen to the song by playing this midi |
Play along with the accompaniment |
| |||||||||
Great! Let's keep moving forward.
Okay, now you know the drill. The exercises provided below aim at developing the i-m-i-m movement of your right hand and your familiarity with the E string. Play through them by listening to the song and then playing along with the accompaniment. The sheet music can be downloaded by clicking on the PDF.
 Exercise 16
Listen to the song by playing this midi
Play along with the accompaniment
Exercise 17Listen to the song by playing this midi
Play along with the accompaniment
Well done!
- You've finished your first 17 exercises, are now familiar with and practiced in using the notes of the 1st, 2nd, 3rd and 4th strings.
- You've practiced alternating between i-m-i-m-i-m with the right hand and have added using p-i combinations and i-m-p and p-i-m with the right hand.
- You're now comfortable with the whole note, half note, quarter note and the dotted half note and have been introduced to the eighth note in Exercise 17 of this lesson.
- A new aspect of your musicality was the introduction of music in multiple voices. You've now learnt how to approach these scores - remember to separate the voices and play them separately before attempting them together and you've practiced them in Exercise 15.
Let's move on to Lesson Six where you'll start using the eight note (or quaver) more frequently. Just two more lessons and you'll be ready to play your first solo piece! And, equally importantly, just two more lessons and you'll be ready to begin preparing for the Grade 1 classical guitar examinations set by Trinity or the Royal School of Music (ABRSM).
Not bad for someone who started as a raw beginner is it? Not everyone needs to do examinations. In fact, there are many, many brilliant musicians who have never done examinations and equally so, many musicians who can't read music. Having said this, it is good to know when you've reached a level and when you've moved beyond it. There are pages in this website dedicated to preparation for these exams. Once you've reached this point, I will recommend you to these pages for further development. Well done on the progress thus far. Keep going through each of the lessons systematically. They've been designed to build up your technical capacity, your knowledge of the guitar and your understanding of the musicality that you will need. Remember, a solid house needs a good foundation. That's great progress and in a short period of time!
Let's move on to Lesson Six where you'll be using the eight note (or quaver). Keep going through each of the lessons systematically. They've been designed to build up your technical capacity, your knowledge of the guitar and your understanding of the musicality that you will need. Remember, a solid house needs a good foundation.
Click here for the top three guitars that I recommend for beginners price range of $100 - $200 and intermediate level guitars which is a definite step up.
Alternately, look through the lessons below and move to your preferred lesson
Lesson 1 - The E String: Start by familiarising yourself with the notes on the E string (1st String) by playing the pieces provided with the MP3 accompaniment. Practice alternating the i-m fingers of the right hand.
Lesson 2 - The B String: Learn and practice the notes on the B string (2nd string) by following the guidelines and playing the pieces with MP3 accompaniment provided. This lesson will help your fingers strength and the i-m right hand alternation will start becoming a little easier too.
Lesson 3 - The E and B String Together: Consolidate your learning of the E and B string by playing through the exercises which provide the opportunity to practice these notes to music arranged with accompaniment in MP3 format. Progress from whole notes, half notes and quarter notes which were used in previous lessons to dotted notes in this lesson.
Lesson 4 - The G String : Learn and practice the notes on the G string (3rd string) by following the guidelines and playing the pieces along with MP3 accompaniment. Enjoy your first introduction to playing music in two voices while allowing the i-m right hand finger combination to become second nature.
Lesson 5 - The D String Together: Become familiar with the D string (4th string) by playing the exercises with the accompaniment provided. Consolidate further working with dotted notes and working with music in two voices. Practice the p-i-m and i-m-p right hand combinations while using the quaver note for the first time.
Lesson 6 - The A String: Become familiar with the A string while you consolidate further your work with two voices and begin, for the first time, working in a new time signature. Practice the p-i-m and i-m-p right hand combinations while using the quaver note for the first time.
Lesson 7 - The E String: Your final lesson. On completion of this lesson you should be ready to prepare for your classical guitar examination Grade 1.

You'll need to go a little deeper into music theory as you proceed. The best online resource for this is Guitar Theory Revolution. It recognises that music theory is very hard for guitarists because music theory has till now been located in the piano paradigm. The Guitar Theory Revolution overthrows the piano paradigm that is holding you back and embraces the attributes of the guitar to unpack music theory. In fact, it goes further and allows you to see that the guitar is one of the best instruments for learning theory.


