Beginner classical guitar lesson 7 : Notes on the E string

These lessons, designed for the beginner classical guitar player, build step by step with each lesson building on the previous lesson in the following ways: (i) knowledge of guitar technique; (ii) familiarity with music reading and (iii) strengthening - and in a safe way - your hands. If you haven't played through the lessons leading to Lesson 7, I suggest you go back and play through those. Remember that the house with the solid foundation is stronger in the long run.


I’m getting a lot of messages from people coming here because they want to learn to play guitar as part of worship. If this is you, you might want to join Aaron Anastasi’s programme. Aaron is a musician and a worship leader. He put together a step by step programme for aspiring Christian musicians. If you're interested, you can use the exercises and advice in learn-classical-guitar-today to develop your finger strength and dexterity and Aaron's lessons to work on strumming and worship music. 

CLICK HERE TO LEARN WORSHIP GUITAR !! 


Beginner Classical Guitar Lesson 7 - Aims

  1. Become familiar with and practice using the notes located on the E string (6th string) and play these together with notes on all the other five strings on the guitar.
  2. Become fully familiar with notes in the first position on the guitar.
  3. Become more comfortable with music in two voices (review lesson 4 on this topic)
  4. Using the p finger, together with i-m right hand alternation.
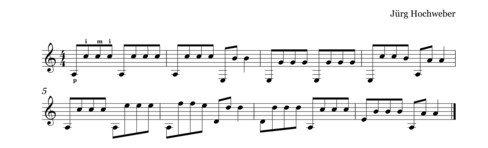
Exercise 20

Exercise 1 to 19 are included in previous lessons

Play along to the accompaniment provided for this beginner classical guitar lesson 

The mp3 for this lesson is provided below. Practice by setting your metronome at a very slow pace. Slowly push up the speed until you can play it confidently at a metronome speed of 80 bmp. When you can play it confidently at this speed, you can play along to the accompaniment provided. 

I’m getting a lot of messages from people coming here because they want to learn to play guitar as part of worship. If this is you, you might want to join Aaron Anastasi’s programme. Aaron is a musician and a worship leader and put together a step by step programme for aspiring Christian musicians. If you are interested, you can use the exercises and advice in learn-classical-guitar-today to develop your finger strength and dexterity and Aaron's lessons to work on strumming and worship music. GO HERE TO LEARN WORSHIP GUITAR

Notes on the study

Use the p-, i- and m- fingers as indicated in the score. Notice that the fingering is provided for only the first bar. The fingering approach provided in this bar is to be used for the rest of the piece of music. This approach of providing the fingering in only the first bar is frequently used in guitar scores. It suggests that the fingering approach applied in the first bar is to be applied to the remaining bars that have a similar musical structure.

This piece, contrary to the previous piece which was in 2/4, is in 4/4 which represents 4 beats in the bar. Review music theory for an overview of musical timing.

The metronome speed is a minimum of 100 bpm for this piece, although the faster you play it the better it sounds. Important though is to keep the notes really smooth otherwise it tends to sound pretty raggedy at faster speeds.

If you feel a bit of a knot in your tummy every time you hear the words 'music theory' then this is the book for you. The material is well organised, clearly explained and anyone can learn the essentials of music theory from these books. Alfred’s provides two smaller versions, but you’ll end up buying the whole pack eventually so far cheaper to get them bungled together like this. This book, which comes with a supporting CD, takes you step by step through everything that you need know. I highly recommend these books.


Tips for this exercise

Here are the key tips and suggestions for working with this exercise. These tips are pretty much the basis of all good playing and you should write or stick this list up in your practice area and look at it again and again. 

  • Use the correct fingering: Where indicated use the p finger and i finger. You should be familiar with the i-m combinations. If you are not, you might wish to go back to earlier lessons where this combination was practiced.

  • Notice the note values: particularly in the context of playing music with two voices as you will be doing in these exercises. Also, the addition of the quaver note. If you need to revise the note values go to music theory.

  • Build up speed slowly: increase the metronome speed slowly and in small increments of no more than five bpm until you are comfortable at the faster speeds. I was taught to increase speed by doing three bpm forward and then going two bpm backwards. It's one idea.

  • Watch your 'c' finger (your pinky) and check what it is doing while the other fingers are moving about. Beginners often have this finger flying around. This is a very bad habit which you should become aware of at this early stage as it leads to very tired hands and excessive movement. Simply become aware of when it happens and try and decrease the movement of the pinky when the finger is not in use. You can also look at Guitar Finger Names which directs you to some composers who’ve designed exercises to strengthen the pinky. Starting these exercises now can speed up your development by years. I know of guitarists who’ve given up playing because they can’t get their hands to work properly. When analysed, it becomes clear that a weak and unco-ordinated pinky is the obstacle.

  • See the diagram below for notes on the E string (6th string) and check which fingers to use in each fret.

    Alternately, review the notes on the fretboard provided.

There is a more expensive edition with a CD, but really Youtube makes that redundant as you can find all the pieces on Youtube. There is also a kindle version, but it's so badly laid out and irritating to work with that I don't advise it. 

The book includes works by Teleman, Tarrega, Sor, Dowland and Bach and has favourites such as Lagrima, Romance and Adelita in its concert repertoire. 

For those who don’t have access to Amazon, or want a virtually (well, actually totally) free copy, you can click on the SCRIBD banner below and sign up for a months free account and download it from there. The version on SCRIBD is called ‘The Classical Guitar I’. It is one of the earlier version of Solo Guitar Playing. I have all the versions and there really isn’t that much difference between them, except that the later versions have a few more pieces in them. Also, there are three pages in the SCRIBD version where the scan quality is just not great. But, if it’s kindda free …

What to do now that I've finished the seven lessons?

If you’ve finished these seven lessons, firstly, a BIG CONGRATULATIONS!!!
You can now begin to play your first pieces. I suggest that you move straight into tackling either Leo Brouwer's Etude 1 (the link to the lesson is below - read further) or the Spanish Study or Greensleeves. You can find the score and instructions in Frederick Noad’s Solo Guitar Playing

Here, as inspiration, is James playing the Spanish Study from Solo Guitar Playing - Book 1, 4th Edition

You'll see from the video that the seven guitar lessons on www.learn-classical-guitar-today.com has fully prepared you to take on this lovely study. 


Congratulations! Now that you've conquered the first position let's review everything that you've achieved:

  • You've used the a- finger.

  • You've used the p-i combinations and the i-m-p and p-i-m combinations of the right hand.

  • You're now comfortable with the whole note, half note, quarter note and the dotted half note.

  • You've played music in two parts or with two voices.

  • You've used notes of different note values and even across music of two voices being careful to play the note values as they are to be played.

  • You have also played your first solo piece.

Start your first performance piece

Your first performance piece in these lessons is Leo Brouwer's Etude 1. It was the first piece that I performed and so I thought it fitting that it be the first piece that I teach you. 

You can find the lesson for leo Brouwer Etude 1 here.

If you need to revise any lessons, browse through them below

  • Lesson 1 - The E String: Start by familiarising yourself with the notes on the E string (1st String) by playing the pieces provided with the MP3 accompaniment. Practice alternating the i-m fingers of the right hand.

  • Lesson 2 - The B String: Learn and practice the notes on the B string (2nd string) by following the guidelines and playing the pieces with MP3 accompaniment provided. This lesson will help your fingers strength and the i-m right hand alternation will start becoming a little easier too.

  • Lesson 3 - The E and B String Together: Consolidate your learning of the E and B string by playing through the exercises which provide the opportunity to practice these notes to music arranged with accompaniment in MP3 format. Progress from whole notes, half notes and quarter notes which were used in previous lessons to dotted notes in this lesson.

  • Lesson 4 - The G String : Learn and practice the notes on the G string (3rd string) by following the guidelines and playing the pieces along with MP3 accompaniment. Enjoy your first introduction to playing music in two voices while allowing the i-m right hand finger combination to become second nature.

  • Lesson 5 - The D String Together: Become familiar with the D string (4th string) by playing the exercises with the accompaniment provided. Consolidate further working with dotted notes and working with music in two voices. Practice the p-i-m and i-m-p right hand combinations while using the quaver note for the first time.

  • Lesson 6 - The A String: Become familiar with the A string while you consolidate further your work with two voices and begin, for the first time, working in a new time signature. Practice the p-i-m and i-m-p right hand combinations while using the quaver note for the first time.

  • Lesson 7 - The E String: Your final lesson. On completion of this lesson you should be ready to prepare for your classical guitar examination Grade 1.

You'll need to go a little deeper into music theory as you proceed. The best online resource for this is Guitar Theory Revolution. It recognises that music theory is very hard for guitarists because music theory has till now been located in the piano paradigm. The Guitar Theory Revolution overthrows the piano paradigm that is holding you back and embraces the attributes of the guitar to unpack music theory. In fact, it goes further and allows you to see that the guitar is one of the best instruments for learning theory. 


Leave me a comment, share your experience and let me know what you think


Share this page:
Enjoy this page? Please pay it forward. Here's how...

Would you prefer to share this page with others by linking to it?

  1. Click on the HTML link code below.
  2. Copy and paste it, adding a note of your own, into your blog, a Web page, forums, a blog comment, your Facebook account, or anywhere that someone would find this page valuable.